Viewing Room Chart
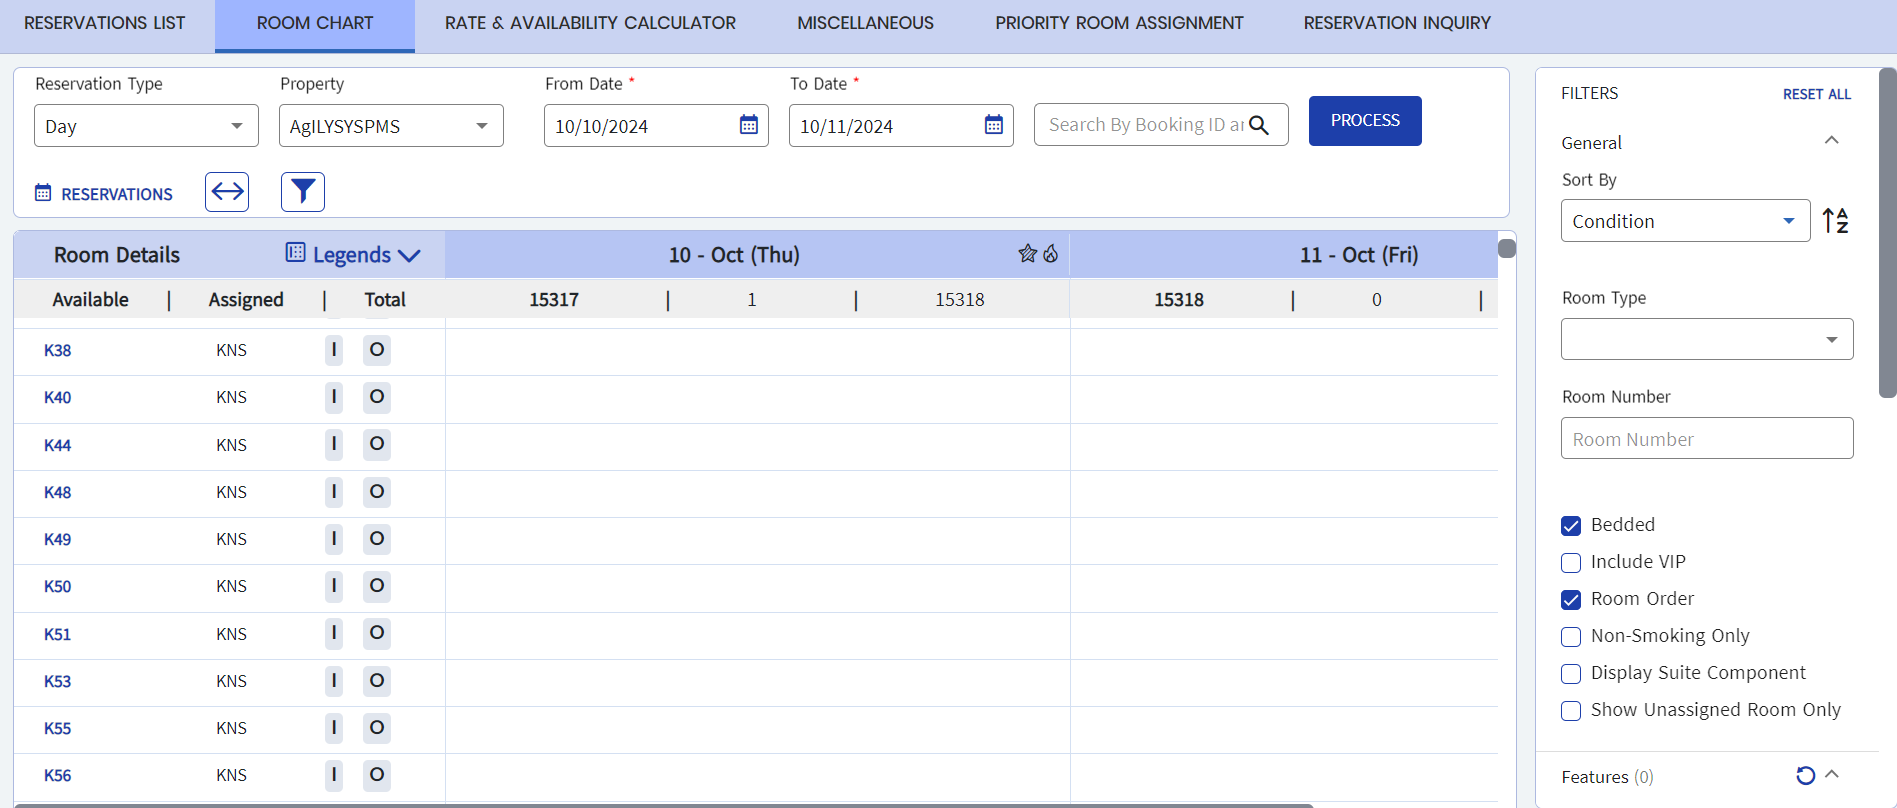
The Room Chart tab enables users to view room allocation and availability for each hour of the selected date or the number of days selected from the From Date and To Date fields. Users can also assign rooms, swap rooms, retain existing tariff or package rates, and modify departure date for reservations.
Breakpoint: 55190 - Room Chart (Front Office - Reservation)
Perform the following steps to view the room allocation and availability:
Navigate to Reservations à Room Chart.
The following table lists the filter options available in the Filters pane:
|
Field |
Description |
|---|---|
|
General |
|
|
Sort By |
Select the preferred sorting option from the drop-down list. The available options include the following:
Users can click the sorting icon next to the drop-down list to arrange the selected option in ascending or descending order. |
|
Room Type |
Select all or the preferred room types for which the room allocation and availability must be displayed. Users can also filter and view the room details for bedded, non-bedded, and perm room types using this drop-down list. |
|
Room Number |
The allocation or availability details of the entered room number will be displayed. |
|
Bedded |
When enabled, the allocation and availability of bedded rooms are only displayed in the search results. |
|
Include VIP |
When enabled, the rooms allocated to or occupied by VIP guests will be included in the search results displayed in the grid. |
|
Room Order |
When enabled, the room list in the grid will be sorted according to the room rotation method selected in the Bedded Room Default screen in the Room and Housekeeping Defaults menu under System Setup. |
|
Non-Smoking Only |
When enabled, the allocation and availability of only the non-smoking rooms are displayed. |
|
Display Suite Component |
When enabled, the suite component rooms are included in the search results displayed in the grid. |
|
Show Unassigned Room Only |
When enabled, the allocation and availability of only the unassigned rooms are displayed. |
|
Features
|
Select the preferred room features. The availability and allocation of rooms that include the selected room features are displayed. The records that are created in the Room Features (Settings à Setup à Room) screen are displayed as options. |
|
Locations |
Select the preferred room locations. The availability and allocation of rooms in the selected locations are displayed. The records that are created in the Room Locations (Settings à Setup à Room) screen are displayed as options. |
|
Building |
Select the preferred building codes. The availability and allocation of rooms in the selected buildings are displayed. The records created in the Building Codes (Settings à Setup à Room) screen are displayed as options. |
|
VIP Codes |
Select the preferred VIP codes. The room chart is generated for stays associated with specific VIP codes. The records of the VIP codes created in the VIP Types screen are displayed as options. |
|
Reservation Type |
Select the reservation type - Day or Hourly. If the selected option is Day, the user can enter the date range for which the allocation or availability must be displayed. If the selected option is Hourly, the details are displayed for each hour of the date selected in the Date field. |
|
From Date |
The date starting from when the allocation and availability details of room must be displayed. When the reservation type selected is Hourly, only the Date field will be displayed. |
|
To Date |
The date until when the allocation and availability details of room must be displayed. |
|
Search By Booking ID |
Search for and select the booking ID for which the room availability and allocation details must be displayed. |
Select the reservation type - Day or Hourly.
Select the preferred property from the Property drop-down list. Users cannot select multiple properties at once.
Select the date range using the From Date and To Date fields for the selected reservation type.
Users can also enter the booking ID of the reservation in the Search field to filter out a specific reservation.
Click Process. The availability of rooms for the selected date or date range is displayed.
If the room has been assigned, the name of the guest staying in the room is displayed. The user can click the tile to view the reservation status, number of guests in the room, stay dates, and room rate.
If any holiday record is created for a date in the Holidays and Hot Dates screen, the icon for holidays will be displayed against the respective date in the Room Chart screen. Also, on hovering over the icon, the description the user entered for the holiday will be displayed.
Similarly, for any hot date record created in the Holidays and Hot Dates screen, the icon for hot date will be displayed against the respective date in the Room Chart screen.
If the date column for a room is blank, it indicates that the room is available for a booking. When a user clicks the blank grid, the Reservation Actions pane appears.
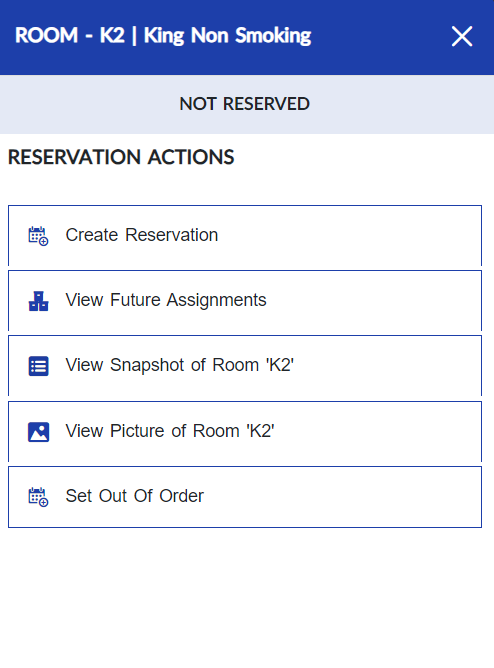
The user can perform the following actions:
-
Create a reservation using the Create Reservation option.
-
View the future assignments of the room using the View Future Assignments option.
-
View room details and history using the View Snapshot of Room ‘<room number>’ option. This option can be accessed directly from the Room Chart screen by clicking on any one of the room numbers displayed under the Available column.
-
View the picture of the room using the View Picture of Room ‘<room number>’ option.
-
Set the room status as Do Not Sell, Planned Out of Order, Emergency Out of Order, or Deactive Room for the selected date range using the Set Out Of Order option.
Users can also perform the following actions in the Room Chart screen:
-
View the legends configured for different reservation statuses, room status, reservation type, and so on by hovering over the Legends icon. The user can modify the color code of the legends by using the Room Chart option in the Legend Configuration menu under System Setup.
-
View the room status and condition of each room displayed under the Room Type column.
-
View reservations for which room move has been disabled. For rooms with room move disabled, a Lock icon will be displayed next to the guest’s name, indicating that the guest cannot be moved to a different room. By hovering over the icon, users can also view the reason why the room change must not be done.

-
Adjust the width of columns in the screen. When the Column Width icon is clicked, the user can enter any value between 10 to 500 in the Column Width field and based on the value entered, the width of all columns will be resized accordingly. By default, the column width will be set to 290. Users can also retain their customized column width settings in even after switching between screens or logging out and back in.
-
Collapse or view the Filters pane using the Filter icon. By default, the Filter pane will be displayed.